XJ Install: Variable Delay Rear Wiper
The Problem:
Driving my 1990 Jeep Cherokee Laredo in Oregon has brought up a flaw in this
very nice XJ. The rear window gets wet when driving down a wet road, but not
fast enough to have the wiper constantly on. So, a couple times a minute I
have to reach down and "pulse" the wiper. This can get very annoying on a 300
mile dive when the rain never ends.
The Solution:
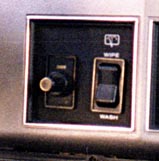
 I knew that there were add-on wiper delay systems out there. Also, my 5-speed
manual XJ has a blank switch housing right next to the rear wiper. Wouldn't it
be nice to have a variable delay knob right there? I though so! While hunting
around at my local auto parts store for brighter lights due to a recent
thread on the XJ mail list (my take, get the H4's; the Wagner "UltraBrights"
I got are better, but not night-into-day better) I ran into a wiper delay. It
came in a big plastic box that they wanted you to stick on the dash some place.
That was not the look I was going for. But, it was fifteen bucks, so I decided
to see if it could be adapted to fit my needs.
I knew that there were add-on wiper delay systems out there. Also, my 5-speed
manual XJ has a blank switch housing right next to the rear wiper. Wouldn't it
be nice to have a variable delay knob right there? I though so! While hunting
around at my local auto parts store for brighter lights due to a recent
thread on the XJ mail list (my take, get the H4's; the Wagner "UltraBrights"
I got are better, but not night-into-day better) I ran into a wiper delay. It
came in a big plastic box that they wanted you to stick on the dash some place.
That was not the look I was going for. But, it was fifteen bucks, so I decided
to see if it could be adapted to fit my needs.
The Adaptation:
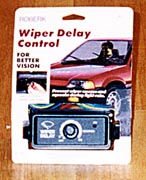
 The system I got was a Roberk Wiper Delay Control. There was no model number, but
it also said "FOR BETTER VISION" and "Prevent wiper smeers and squeaks during light
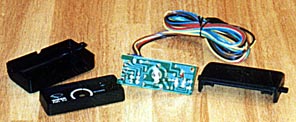
rain" on the package. To open the box, I had to unscrew the side mounts
and then snap off the front cover. Everything is contained on one circuit board.
The system is basically a relay, a
555 timer IC and the
capacitors and resistors to give the proper timing. The knob is a variable
resistor and it controls the delay (obviously). The problem here is that it is
soldered directly to the circuit board. There is no way that board is fitting
in the switch area!
The system I got was a Roberk Wiper Delay Control. There was no model number, but
it also said "FOR BETTER VISION" and "Prevent wiper smeers and squeaks during light
rain" on the package. To open the box, I had to unscrew the side mounts
and then snap off the front cover. Everything is contained on one circuit board.
The system is basically a relay, a
555 timer IC and the
capacitors and resistors to give the proper timing. The knob is a variable
resistor and it controls the delay (obviously). The problem here is that it is
soldered directly to the circuit board. There is no way that board is fitting
in the switch area!
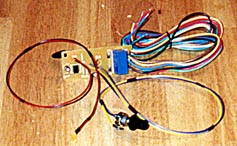 The solution here it to make the switch "remote". This is
done by de-soldering the switch and putting it on wires. My wire length was about
2 feet, but if I did it again, I would got to 2.5 to 3 feet. While I was at it,
I found a amber, rectangular LED that would better complement the LED's on the
fog light and rear defroster switches on the other side of the steering column.
I then put this on wires too.
The solution here it to make the switch "remote". This is
done by de-soldering the switch and putting it on wires. My wire length was about
2 feet, but if I did it again, I would got to 2.5 to 3 feet. While I was at it,
I found a amber, rectangular LED that would better complement the LED's on the
fog light and rear defroster switches on the other side of the steering column.
I then put this on wires too.
Here is where you really benefit from my experience. I had the whole
unit wired up when I found that the delay keeps the relay on just a
little too long. The result is the wiper normally goes twice, but sometimes
it went only once. That was annoying! So, I had to take the unit out and
engineer a solution.
The resistor marked R2 controls how long the relay stays on. This is an 82 k-Ohm
resistor (gray red orange gold) and that makes the relay stay on about 1
second. I figure half of that would be perfect. That means we need a 41 k-Ohm
resistor (yellow brown orange gold). But, the easiest way to halve this value
is to solder another 82 k-Ohm resistor right on top (in parallel) of the
current one. This way, you can easily go back if you need to.
The Installation:
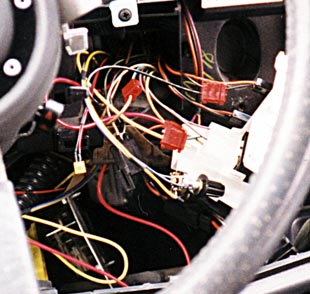 Open up your dash (I will leave that lesson to somebody else, like a book) and
unscrew the "housing" that holds the rear wiper switch and the blank switch.
After some hunting with my DMM, I found that the orange is the hot, always 12V wire
and the green with the white stripe is the one that controls the wiper (I am getting
this info from grainy pictures, so double check with a DMM). Now, you can follow the
directions on the "POSITIVE SWITCHING vehicles" part of the instruction manual,
but I will say them
here. Splice the red wire from the delay unit into the orange hot wire. Cut
the green/white wire at a spot were there is enough wire coming from the switch and
from that dash that you can work with each. Then use that and splice in the
yellow wire from the delay unit to the switch side and the brown wire to the
delay side. Now hook the black wire up to your favorite ground location (I
don't suggest using the alligator clip for a permanent attachment).
Open up your dash (I will leave that lesson to somebody else, like a book) and
unscrew the "housing" that holds the rear wiper switch and the blank switch.
After some hunting with my DMM, I found that the orange is the hot, always 12V wire
and the green with the white stripe is the one that controls the wiper (I am getting
this info from grainy pictures, so double check with a DMM). Now, you can follow the
directions on the "POSITIVE SWITCHING vehicles" part of the instruction manual,
but I will say them
here. Splice the red wire from the delay unit into the orange hot wire. Cut
the green/white wire at a spot were there is enough wire coming from the switch and
from that dash that you can work with each. Then use that and splice in the
yellow wire from the delay unit to the switch side and the brown wire to the
delay side. Now hook the black wire up to your favorite ground location (I
don't suggest using the alligator clip for a permanent attachment).
The system should now work. With the ignition "on", turn the knob. If the LED
doesn't light, then either the red and/or black wire has a problem. If the LED
comes on but the wiper never wipes (it takes about 5 seconds for the first
wipe), try using the switch. If the wiper doesn't wipe then, you have a
connection problem in the yellow and/or brown wires.
NOTE: I found the splice connectors provided work great with the Jeep wires,
but they were hard to make contact with the cheap 22-gague wires from the
delay unit. I had to trim some insulation to make some of them work. Make sure
you have a good connection that won't slide out!
Modifying the Blank:
The variable resistor is very big with all of the leads coming out of it, so
space is a big issue on the blank. To drill the main hole for the switch, I
used a 9/32" drill bit centered up from the "ridge" (the U-shaped
plastic protrusion). I can't remenber exactly how far up, but it was close to
half way, as the entire switch, with its "legs" has to fit.
I then drilled another hole with a 1/8" drill bit centered
at where the metal thing that comes out of the resistor to keep it
from turning. For the LED, I drilled a couple of 1/8" holes right under the
"hook" and did the rest with a small chisel and an X-Acto knife. You would have
to do what ever works for your LED.
To hold the LED, I used a generous amount of hot-glue globbed around the back of
the LED. the shaft of the resistor just gets tightened up with the nut. Make sure
that tab goes through the small hole. I didn't have enough threads showing to
use the washer, but I don't think that will matter.
I put the circuit board back in the big plastic box it came it, as this will
protect it from evil behind the dash. I placed the box on top of the
velcroed-down black box (The one that is next to the big yellow AMC labeled
box).
 Put your dash back together and you are done!
Disclaimer:
I did this on my Jeep. It might not work on any body else's. My wiring system
might short out tonight, I don't know. This page is just for what I did on
my Jeep. Anything you do to yours is your own fault. While I tried my best,
there could be a typo or something I forgot that might ruin your vehicle or
make it explode. I am not responsible. Have a nice day.
This page is crafted by: Bill Anderson --
willian@pogo.wv.tek.com